

April 25, 2018
How to Ensure Text Message Compliance in Shopify
This tutorial will explain all the steps you need to take for your Shopify to be in full compliance with text messaging regulations.
Complete the guide and you will not have to worry about regulations when you are engaging with your Shopify customers via text messages.
Step 1: Add an Alternative for Subscription on Checkout
1. Go to Settings > Checkout and under Email Marketing check the field for Preselect the sign-up option.
2. Confirm the changes by clicking the Save button at the top or bottom.
3. Scroll down to Checkout language and click on Manage checkout language.

4. Search for Checkout Marketing.
The field there is called Accept marketing checkbox label.
In the text area you should add something like:
Sign up for exclusive offers and news via text messages and/or email
5. Confirm the changes by clicking the Save button at the top or bottom.
Step 2: Enable Phone fields and Change Placeholder
1. Go to Settings > Checkout and find the Form options field.
Make the Shipping address phone number to be Optional.
2. Scroll down to Checkout language and click Manage checkout language.
3. Find the Phone label setting. This field will be located just below the Province Placeholder.
Under Phone Label and Optional Phone Label add something like:
Phone number for updates and exclusive offers
4. Confirm the changes by clicking the Save button at the top or bottom.
Step 3: Update your Privacy Policy
1. Go to Settings > Checkout and scroll down to Refund, privacy, and TOS statements.
If you don’t have a Privacy Policy, click on Generate a sample Privacy Policy. If you do, skip to the next step.
2. Edit your privacy policy add/copy the following text:
Text Marketing and notifications (if applicable): By entering your phone number in the checkout and initialising a purchase, you agree that we may send you text notifications (for your order, including abandoned cart reminders) and text marketing offers. Text marketing messages will not exceed X per month. You can unsubscribe from further text messages by replying STOP. Message and data rates may apply.
Important: Do not forget to substitute your maximum designated number of messages in X.
3. Confirm the changes by clicking the Save button at the top or bottom.
Step 4: Set Quiet hours
1. Go to Apps > SMS Marketing and Automation by SMSBump.
Select Settings and scroll to the Do not Disturb field.
Set it to Enabled and set the quiet hours for your area. The recommended settings are From 21:00 (9 PM) to 8:00 (8 AM).
Video Tutorial: Watch here.
2. Confirm the changes by clicking the Save button at the bottom.
Step 5: Include an Opt-out Option in Automations and Text Marketing
1. Go to Apps > SMS Marketing and Automation by SMSBump.
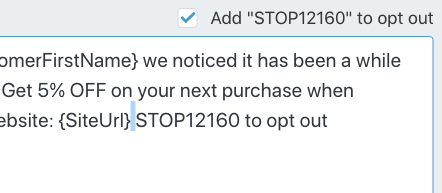
Whenever you are activating an Automation or creating a Text Marketing Campaign, you need to make sure that this automation has the Opt-out option enabled.
Important: Please mind that the digits after STOP will be different for you and WILL NOT say "12160".
2. When creating your text message, make sure that there is space between the link in curly brackets “{ }” and the unsubscribe tag “STOP####”.

Mihail Savov
Start growing today
Sign up today and join 90,000+ eCommerce businesses making it big with Yotpo SMSBump