Defining the Behavior of Your Popup
Defining the Behavior of Your Popup
Article Summary
Share feedback
Thanks for sharing your feedback!
When collecting subscribers, popups are your best friends. They can be eye-catching, personalized, and super effective. And just like best friends, they should know when is the right time to show up… or leave, as there is a thin line between an engaging and annoying popup.
In this tutorial, we’ll show you how to get the most out of your popup campaigns by choosing who sees them and when. We’ll go through a variety of advanced behavior options and share our best practice tips on how to create engaging and high-converting popups.
Setting up the behavior of your popup
In your Yotpo SMS & Email main menu, go to Audience > Subscriber Collection Tools.
Here, you can adjust display options, timing, frequency, and a total of 11 advanced conditions.

Show on
Choose where you want your popup to appear: on desktop devices, mobile devices, or on both.

Timing
This is where you set up the timing of your popup: how long will it take to appear after a visitor opens your website. You can set up a delay (to show after a specific amount of time, after the visitor scrolled a % of the web page, or both) or show the popup immediately on page load. Choose an option by ticking the checkbox to the right.
We don’t recommend showing the popup immediately after page load as it can be annoying for some people. Our experience shows it’s best if you set a delay of 15 seconds, or once visitors have scrolled down more than 50% of the page.

Floating Button
This feature is a dynamic, non-intrusive version of your popup that is discreetly shown as a floating button when you scroll through a page.

It can be enabled from the menu at the top and you can choose when to show it to shoppers: before displaying the full popup, or once the form is closed.
Pro tip:
We recommend showing the Floating Button after the popup is closed. That way visitors who have been exposed to the form once, but change their mind about subscribing at some point, can easily return to it.

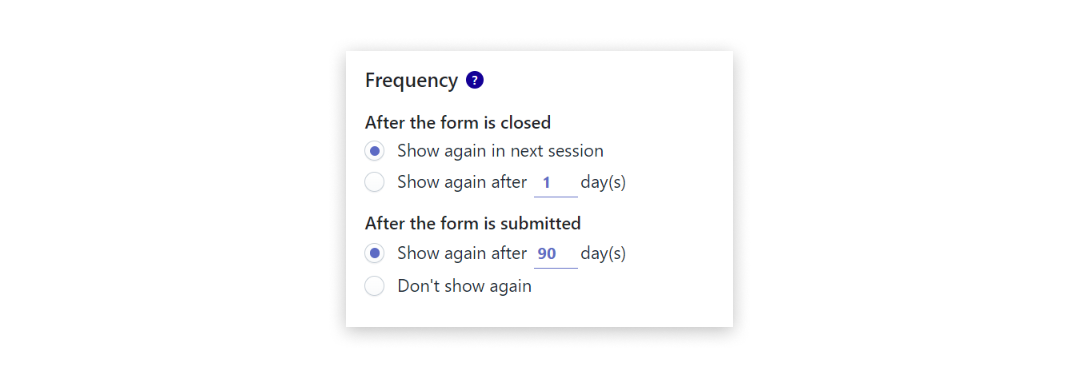
Frequency
Now is the time to determine how often your popup will appear to your website visitors. When closed, you can set it to show the next session or hide it for a certain period. When submitted, you can hide it for a longer time or don’t show it again.
 Advanced Conditions
 Advanced Conditions
Last, but not least is the Advanced Conditions section. Once enabled, all active conditions will be listed here. Keep in mind they are available to Yotpo SMS & Email users on the Growth plan and above.
Click the Add button to see the full list of available options with short descriptions.
 To access each condition simply click the Add button on the right.

We will now walk you through each of the available options so you can get the most out of your popups.
Exit Intent
The Exit Intent condition will set your popup to appear as soon as a visitor displays behavior that suggests exiting your store (i.e., when their cursor hovers over to close the tab). You can activate it by clicking the Enable button on the right.
 Click-Based
 Click-Based
This option allows your popup to appear whenever a user clicks on a specific button on your website. All you need to do is add the button’s CSS Class/HTML ID in the empty box, select the corresponding option from the dropdown menu on the left, click the Add button, and then Save Trigger. If you want to show the popup only once per session, don’t forget to tick the checkbox below.

Specific URL
This condition allows you to include or exclude visitors from seeing your popup when going through a specific URL. Let’s say you want to show the subscription form to people coming from a certain social media campaign. Simply paste the link in the text box, click the Add button, and save.

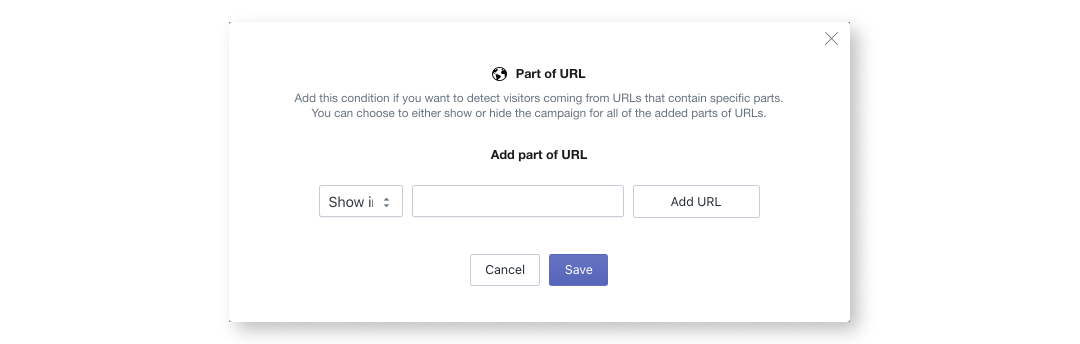
Part of URL
Similar to the previous option, this condition allows you to include or exclude visitors coming from URLs that contain specific parts from seeing your popup. To do so, just fill in the part of the URL in the empty box, click on the Add URL button and save.
 Geotargeting
 Geotargeting
Staying true to its name, this condition enables you to show or hide your popup for shoppers from specific countries. Let’s say you operate an international store and you want to launch a targeted campaign to a specific audience. You can have a popup and a welcome message in French, shown only to visitors from France. All you need to do is choose the type of action, select a country from the drop-down menu, click the Add button and save.

Sequence
This option can come in handy if you want to show or hide your campaign from visitors coming from a specific path of pages. Simply choose the type of action, paste the URLs in the empty box, click the Add button, and save.

Page Count
This option allows you to show or hide your campaign from visitors, based on the number of pages they clicked on during the current or all sessions. You just need to fill in the number in the empty text box and choose the specific conditions from the drop-down menus.
If you tick the Count only unique pages, the Destroy session checkbox will appear. It gives you the option to delete a visitor’s history after several days, hours, minutes, or seconds after leaving your website.

Once configured, don’t forget to click the Save Trigger button.
Hide Campaign
This one is simple. It allows you to make your campaign active or inactive and you just need to choose between the two options and click Save Trigger.

Show Count
If you don’t want to overwhelm your frequent visitors with the same popup, you can enable this option. Fill in the number of times your subscription form should appear after which your campaign will automatically hide. Don’t forget to save.

Specific Referral
This condition lets you show or hide your campaign from people who visit your store from a specific referral URL. Just choose the type of action, enter the link in the text box, click the Add Referral button, and save.

Specific UTM
This condition allows you to target your audience based on a UTM campaign with specific parameters. A UTM (or Urchin Tracking Module) is a snippet of code at the end of a URL that makes it easier to track where customers are coming from. So if you want to show or hide your campaign to people coming from a specific source, medium, or campaign name, simply enter your UTMs in the corresponding boxes and add them to the list by clicking Save & Add Another.
 You’re all set! You can add as many advanced conditions as you want and make sure your popup campaigns appear to the right people at just the right moment!
Was this article helpful?