Collecting Subscribers with Shopify POS and Yotpo SMS & Email
Collecting Subscribers with Shopify POS and Yotpo SMS & Email
Article Summary
Share feedback
Thanks for sharing your feedback!
Did you know you can collect subscribers for your text marketing campaigns from your live store locations? A customer comes to the counter and a staff member offers them a 10% discount on the purchase if they sign up for your text marketing services. It is that simple! All you need is a mobile device (a phone or a tablet) equipped with the Shopify Point of Sale (POS) app and Yotpo SMS & Email.
In this article, you'll learn how to set up the entire process and start collecting subscribers at points of sales.
Get started with Shopify Point of Sale (POS) app
The first step is to download the Shopify Point of Sale (POS) application from App Store (for iOS) or Google Play (for Android). Please keep in mind that Google Play has not yet updated to the latest version of the app, so menus, features, and design for Android look a bit different than those for iOS.
When you download the app, you need to log in with your Shopify store credentials: email address and password. More detailed information on how to get started with Shopify POS can be found in this guide.
Collecting subscribers at POS
The first thing you need to do to start collecting subscribers with the Shopify POS app is adjust some of the main settings.
From the main menu of the Shopify POS click Home > Settings.

Scroll down to All Apps and click on SMSBump: SMS Marketing & Email. Remember you need to have the app installed to your Shopify store for the app to appear in Shopify POS as well.
All you need to do afterward is complete the following 5 simple steps.
Step 1: Fill in Branch Names
Make sure you fill in the information about your store locations (branches). This will help you later on if you want to know where your subscribers came from.

Currently this feature is only available for the United States and Canada, which is why you can’t change the default country code.
Step 2: Set a Confirmation Message
This is the content of the text message your customers will receive after the store clerk fills in their phone numbers. Keep in mind that it is a 2-step subscription process, meaning that your customers will need to reply to this text with YES in order to opt in for your text marketing services.
Make sure this confirmation message contains relevant information. There are a total of 3 available shortcodes that you can use for that
{StoreName} - shows the name of your store
{BranchName} - shows the location of the store the customers is in
{SiteUrl} - the link to your Shopify store
Here is a sample confirmation SMS:
{StoreName}: Thank you for visiting our {BranchName} location. You are receiving this message because you have requested to subscribe to our text marketing list. Please reply YES to confirm your subscription.

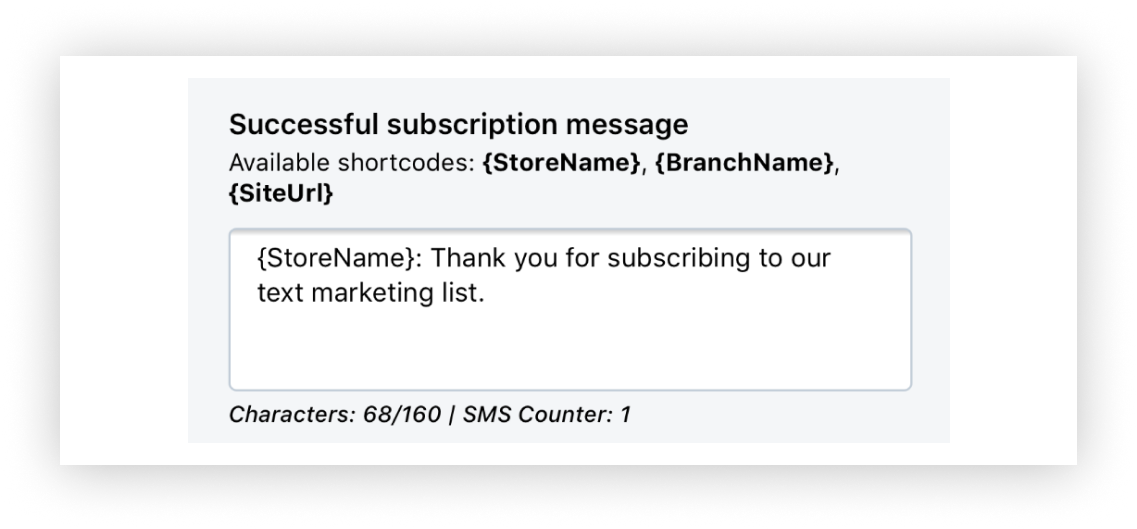
Step 3: Set a Successful Subscription Message
This is the message your customer will receive when they reply YES to the confirmation message. Keep it short with a simple: Thank you for subscribing.
Step 4: Set a Discount
The last step is to set up the different incentives you are going to offer to your customers while in store for subscribing to your text marketing service. It could be either a flat discount of $10 or a percentage discount, for example 5%. In the Available discounts section you can specifythe discounts that your staff can offer at the moment of purchase.

Click on the Save Settings button below.
Step 5: Adding the SMSBump tile
Go to Home, tap on Add tile, and from the apps menu select SMSBump.

Now you can open the app by simply tapping on the tile you just added!
Overview
Now that you have successfully configured the settings of your Shopify POS app and added the tile, let’s check how it happens in real-time.
Imagine that your customer is at the cashier desk of your store in CityMall. A member of your staff offers them to opt-in for your text marketing services and receive a 5% discount on their current purchase. The customer agrees and provides their phone number.
What your staff representative needs to do next is go to the Shopify POS app and click on the SMSBump Marketing & Automation box in Dashboard. Then choose the correct location under Branch name and fill in the customer’s phone number. At this point the Subscription status is Not Confirmed. When the associate clicks the Send subscription confirmation button, the customer will receive the Confirmation message. Now the status will change to Awaiting Confirmation. Keep in mind that if the customer has already registered for your text marketing services, the status will change to Already subscribed.

As soon as the customer replies YES to the Confirmation Message (therefore agrees to become a subscriber and receive text marketing updates from you), the status changes to Confirmed and then the staff member is able to assign the offered discount. They can select from the predefined discounts in the app or make a custom discount as shown below:

And now this particular discount can be applied to the customer’s current purchase and the staff member can continue with the checkout as usual. This customer has completed the 2-step subscription process and agreed to receive marketing updates from your brand.
Pro tip: Collected phone numbers via Shopify POS will become part of your general Text marketing list, allowing you to target your subscribers from different store locations with tailored offers and send them personalized text messages.
This was our tutorial on how to use Yotpo SMS & Email and the Shopify POS app to collect subscribers at your physical locations. This will help you grow your lists, make more targeted segments, extend more personalized offers and achieve better results with your next text marketing campaigns.
Was this article helpful?