Adding and Authenticating a Sending Domain
Adding and Authenticating a Sending Domain
Article Summary
Share feedback
Thanks for sharing your feedback!
A dedicated and authenticated sending domain provides a layer of security and credibility to the emails that you send to your customers. Add a sending domain so you can increase your deliverability rates, add brand credibility, and remove via yotpoplatform.com from the "From" field in emails.
In this article, you’ll learn how to add and authenticate your sending domain.
How it works
An authenticated sending domain shows email providers that Yotpo has permission to send emails on your behalf. This has a positive impact on your reputation as a sender and your email deliverability.
Email service providers distrust messages that don’t have domain authentication set up because they cannot be sure the message comes from you. As per new requirements from the major inbox providers, if you regularly send 5,000 emails or more, you must authenticate your domain. Explicitly stating that it comes from you increases your reputation, and makes it less likely that the provider will filter your email. This means there's more chance your emails will get into your recipient’s inbox and less chance they'll be marked as spam. Learn more in Yotpo Email Deliverability Guide
What do my emails look like with and without a sending domain?

Adding a sending domain
To add a sending domain:
- In your Yotpo Email main menu, go to Settings > General Settings.
- Scroll down to Email Settings.
- Under Dedicated sending domain, click Get started.
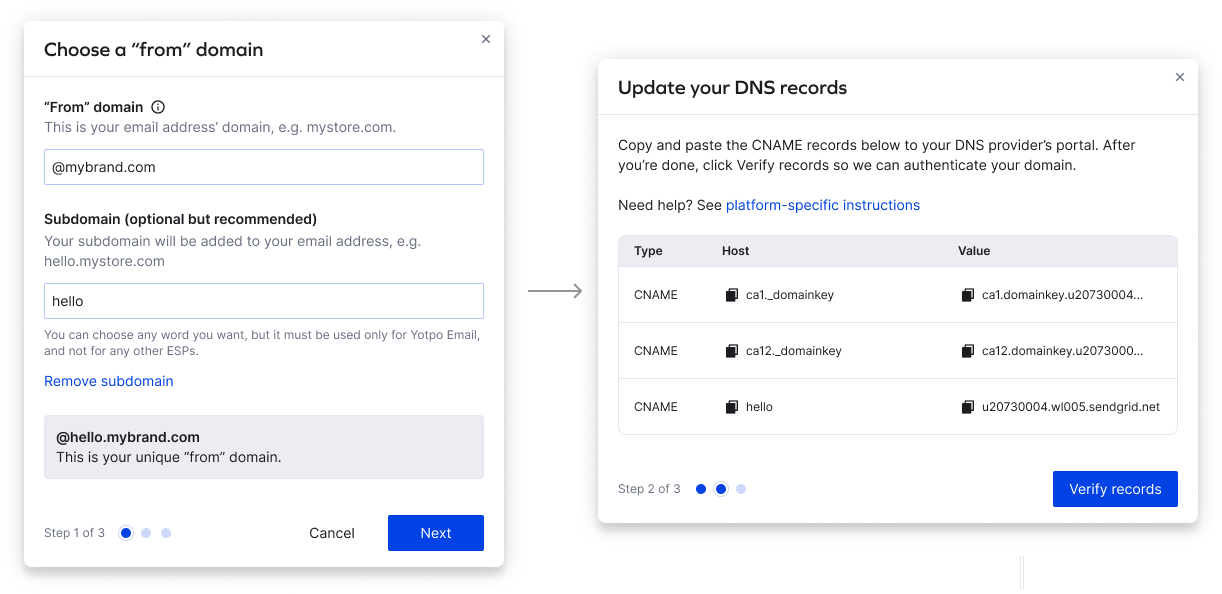
- Add your “from” domain and (optional) subdomain.
Please note:
Adding a sending subdomain can help you isolate your marketing activity and prevent your sender reputation from being affected by other email activity from your domain. For example, if your “from” domain is mybrand.com, we recommend you use the subdomain hello. Your final “from” domain will be hello.mybrand.com.
- Click Next and copy the CNAME records.
- Add the records to your DNS server.
- After adding the records to your DNS server, return to Yotpo and click Verify records. If the verification is successful, you will move to the last step which reminds you to add a valid DMARC record to your domain. If you have one already, you can click Got it.
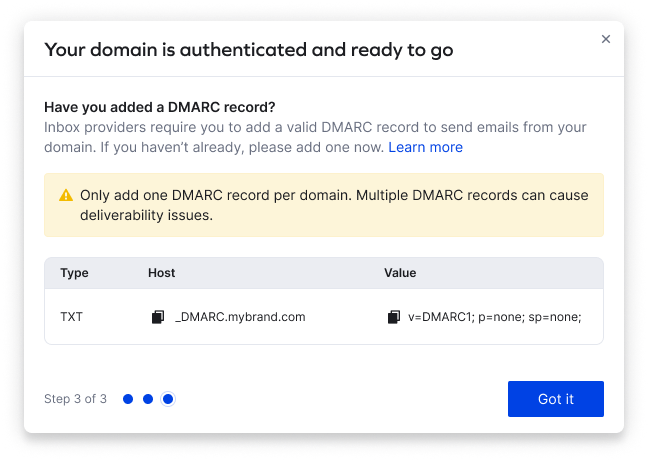
- Click Got it and close the modal.
- After you have completed the domain authentication process, you'll be prompted to warm up your domain. To learn more about domain warm-up, go to Warming Your New Domain Infrastructure.


Tip:
If the verification fails, please try pasting the CNAME records again.
Adding records to your DNS server
To complete this stage of the process, you will need to go to your DNS provider's platform and apply the new DNS records, which were created in Yotpo Email. To make these changes, you may need to seek assistance from your IT team.
Some domain registration services may not permit you to directly modify all DNS records. If this is the case, you should get in touch with your DNS provider for guidance on how to update them. Here are the guides for updating DNS records of the most popular providers:
Adding a DMARC record
To add a DMARC record, log into your DNS Hosting provider and add the following TXT record:
- *Host/name: _dmarc
- Value: v=DMARC1; p=none; sp=none
Some domain hosts automatically add your domain name after _dmarc. If not, you should add it yourself, i.e. _dmarc.yourbrand.com.
Please note:
We highly recommend consulting with an email deliverability expert or using an online tool to make sure your DMARC record was set up correctly.
Learn more about DMARC records in Google Help.
Next steps - Warming your new domain infrastructure
After you add a new sending domain, it's necessary to warm up the infrastructure. The warmup requires sending fewer emails right after creating the new domain, and gradually increasing the volume over a period of time. Learn more
Was this article helpful?